 WalletFeed
Send Apple Card transactions to Make
WalletFeed sends your Apple Card, Apple Cash and Savings transactions from your iPhone to a scenario in Make (the previous name of Make is Integromat). You add a Custom webhook in Make, then paste its URL in WalletFeed.
Before you start
You must have these items:
- An iPhone with iOS 26 or a newer version. WalletFeed is available only in the US.
- WalletFeed Pro, a subscription with a 1-week free trial, or a one-time Lifetime purchase.
- A Make account. You can get an account on Make's sign-up page. The Free plan has the Webhooks app.
- A computer with a web browser for the steps in Make. The screenshots show Make on a computer.
Your URL stays on your iPhone
- WalletFeed keeps the webhook URL in the Keychain on your iPhone. iOS encrypts the Keychain.
- The webhook URL does not go to iCloud Keychain or to your other devices.
- WalletFeed has no account and no servers. No person at WalletFeed can see or get the webhook URL.
- Your iPhone sends the webhook URL only to Make, in each request to Make.
- When you delete the destination, WalletFeed deletes the webhook URL from your iPhone.
Step 1: Add a Custom webhook in Make
The webhook gives you a URL. WalletFeed sends your transactions to this URL.
-
On your computer, get access to your Make account.
-
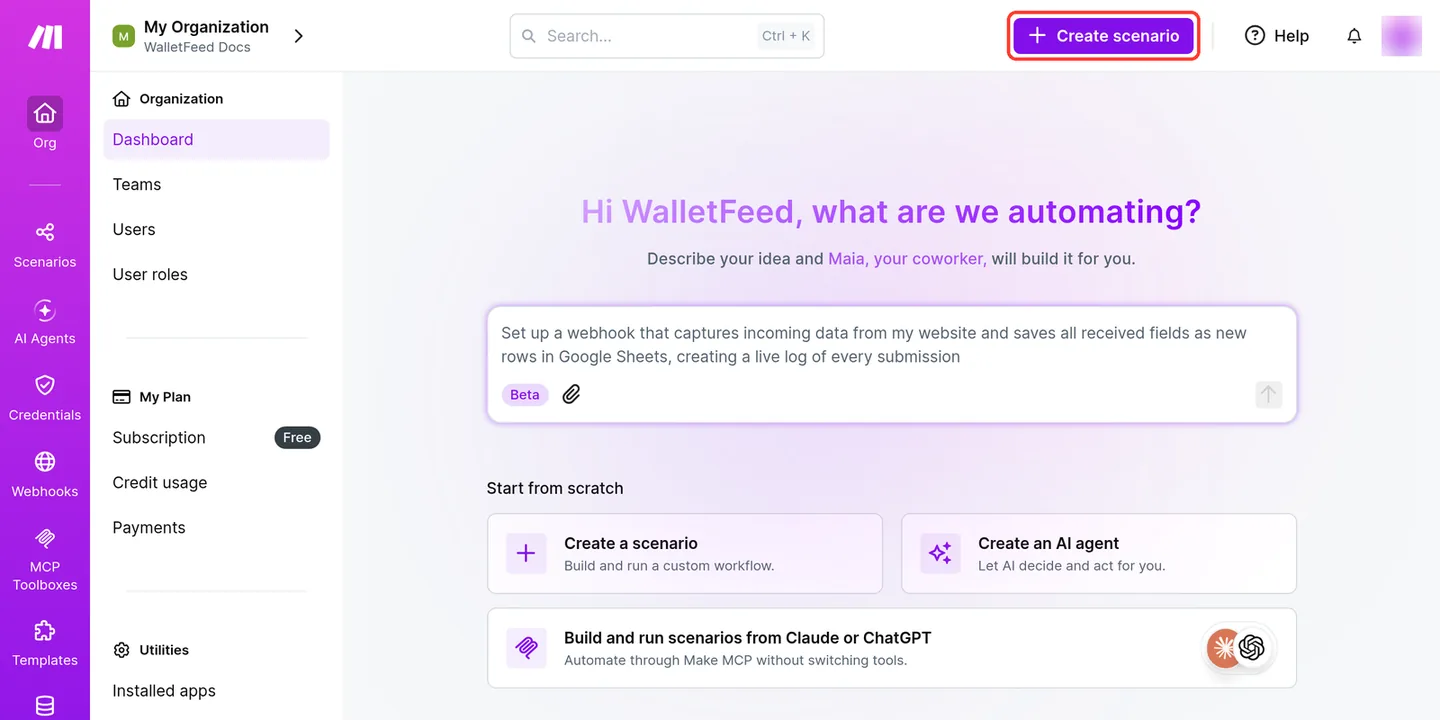
Click + Create scenario.
-
If Make shows a Scheduling message, click Got it.
-
If Make shows the Maia panel, click X on the panel.
Maia is not necessary for these steps.
-
In the scenario editor, click the large +.
-
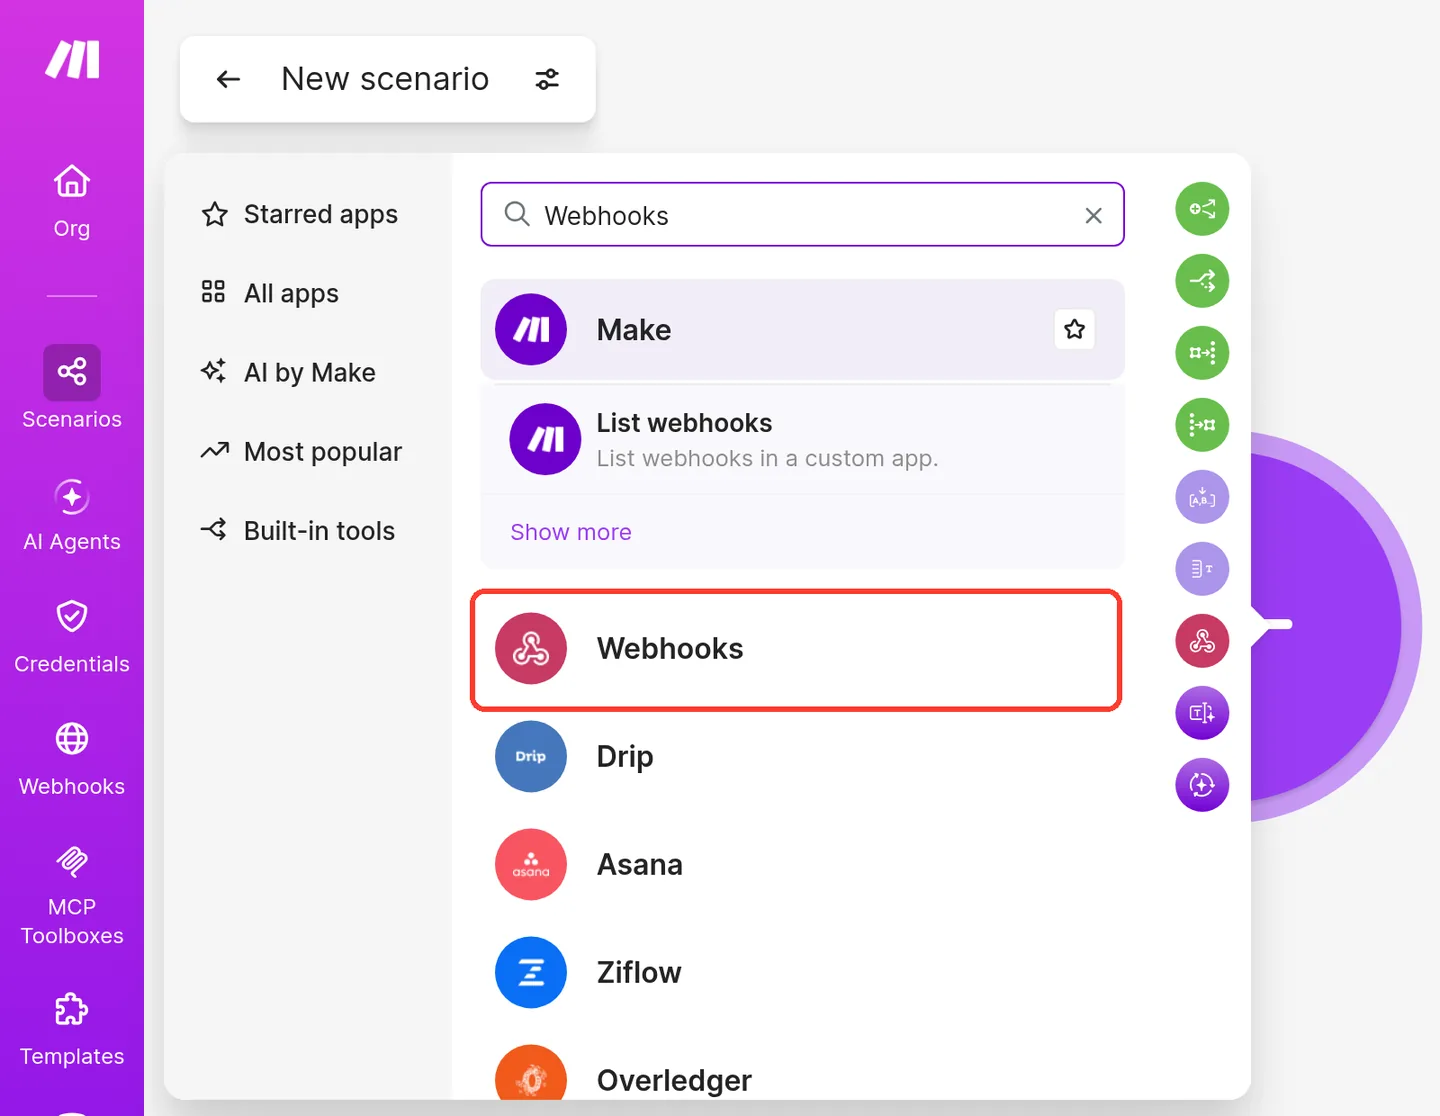
In Search all apps or modules, type
Webhooks. -
Click the Webhooks app with the red icon.
Make shows the app Make first. Below it, Make shows its webhook modules, for example List webhooks. The app Make is not correct for these steps.
-
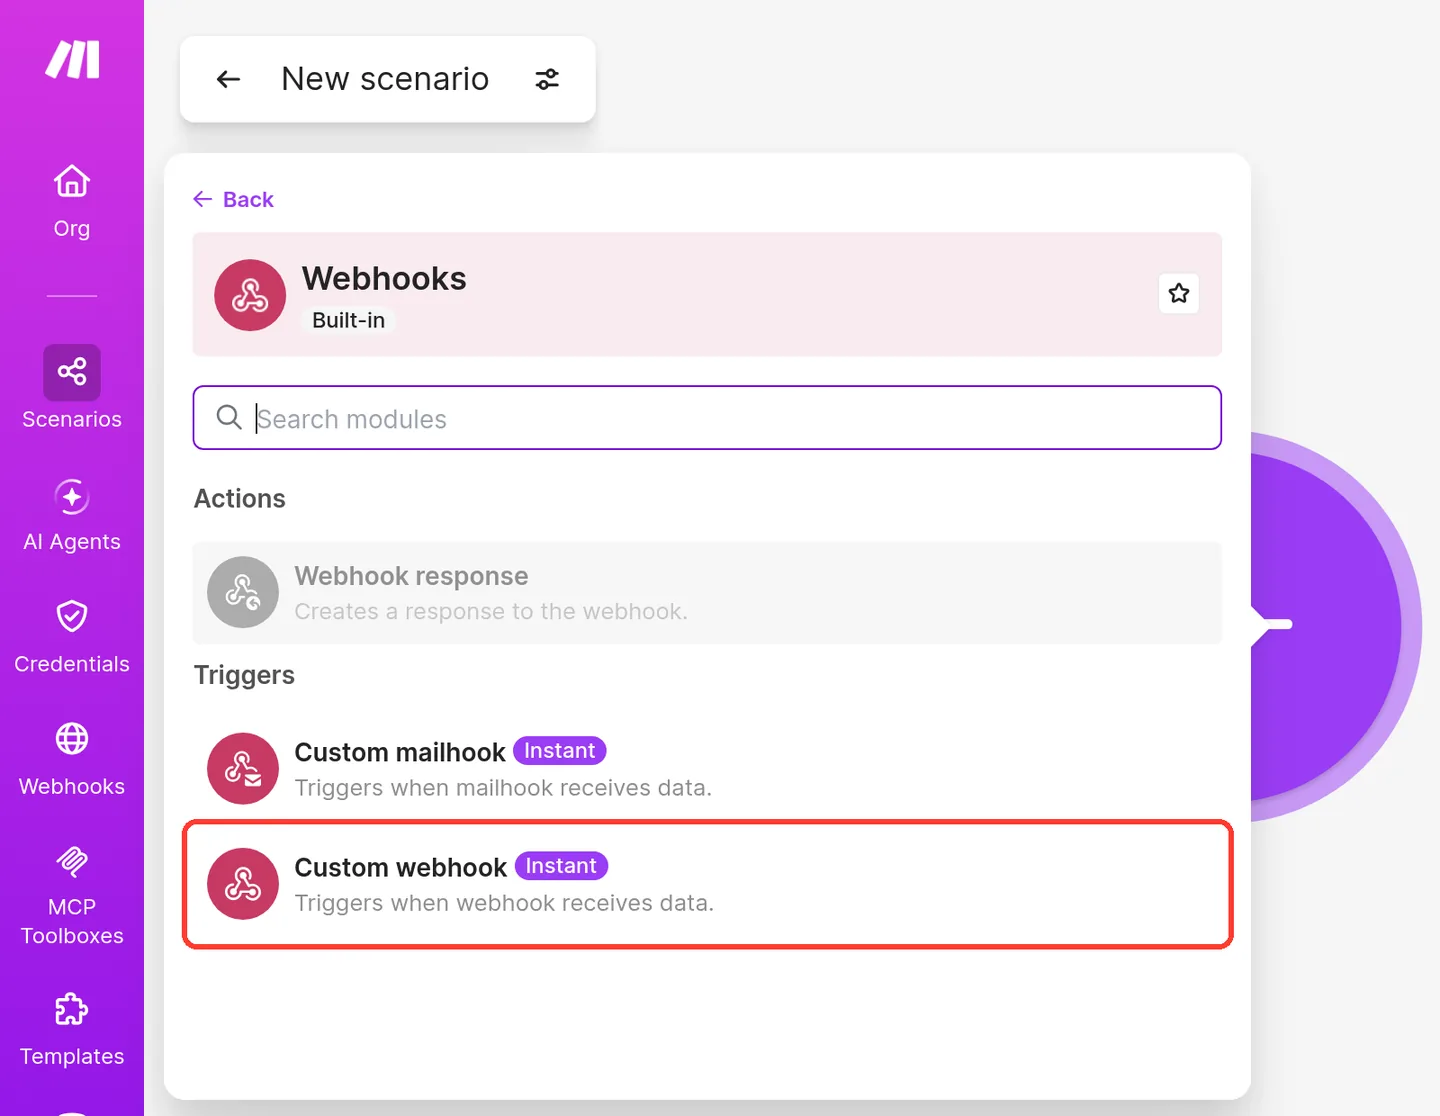
In Triggers, click Custom webhook.
Custom mailhook is above Custom webhook. Custom mailhook is not correct for these steps.
-
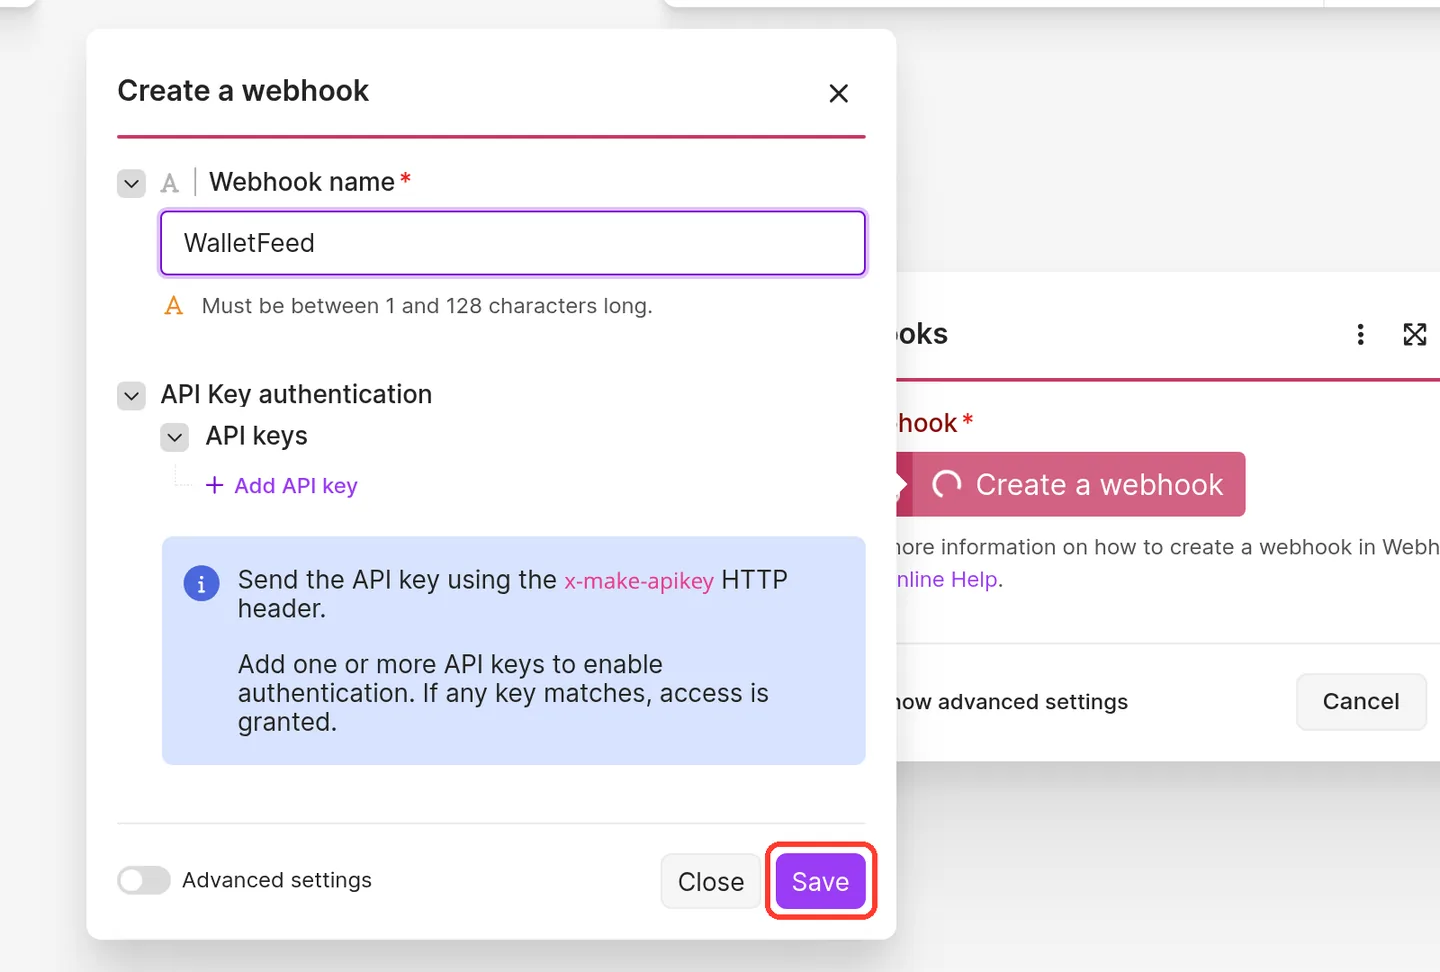
Below Webhook, click Create a webhook.
-
In Webhook name, replace the name with
WalletFeed. -
Do not click + Add API key.
If the webhook has an API key, Make accepts only the requests that contain the key. WalletFeed cannot send an API key.
-
Click Save.
-
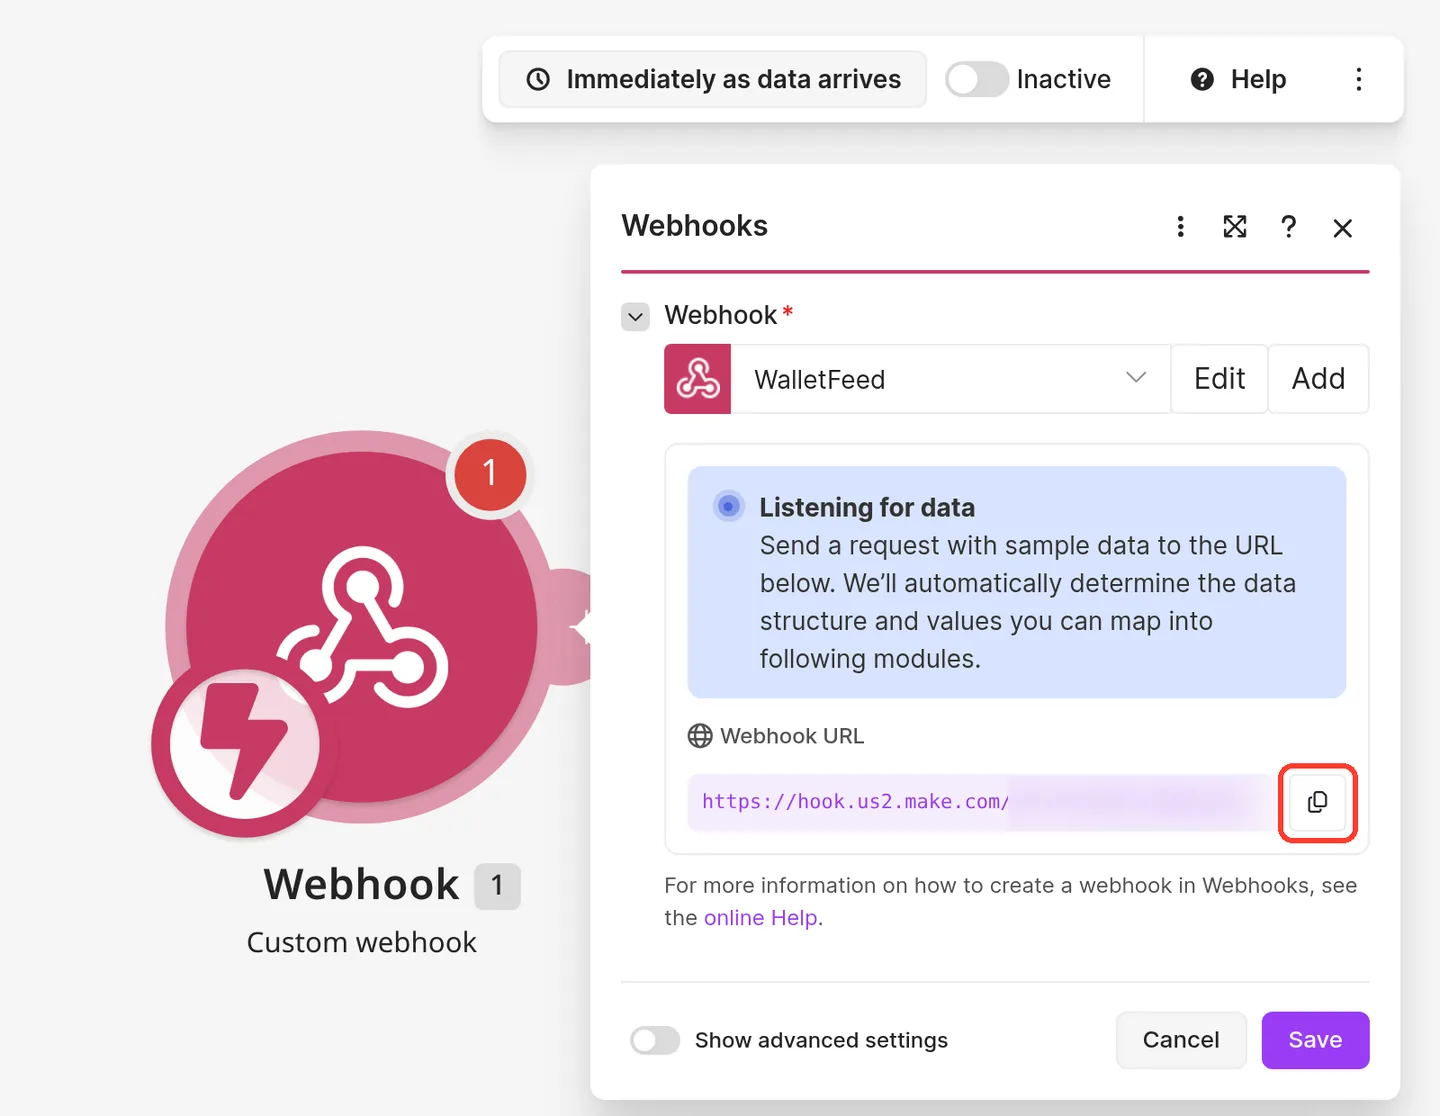
Below Webhook URL, click the copy button at the end of the URL.
Make does not show the full URL. If you select the text, you copy only a part of the URL.
-
Keep the scenario open.
When you tap Add in WalletFeed, Make must show Listening for data.
Step 2: Add Make in WalletFeed
On Make's Free plan, while the scenario is not active, the queue of the webhook can contain a maximum of 50 transactions. A new Make destination receives a maximum of 30 days of previous transactions, and these can be more than 50.
If you use Make's Free plan, you can set Initial History to Today before you add Make. Then Make receives no previous transactions. To set Initial History, do these steps:
-
On your iPhone, open WalletFeed.
-
Tap Settings (the gear button) at the top of the screen.
-
In the Sync section, set Initial History to Today.
Settings shows the Sync section only with WalletFeed Pro.
-
Tap Done.
To add Make, do these steps:
-
On your iPhone, open WalletFeed.
-
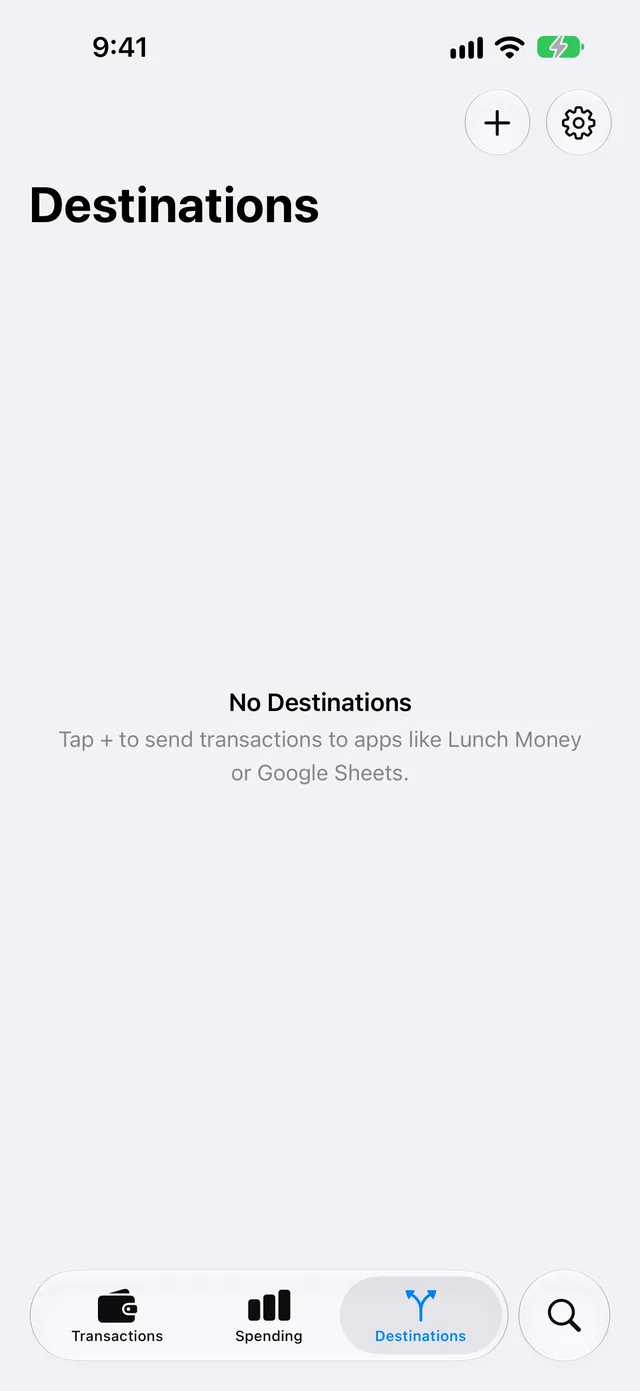
Tap Destinations.
-
Tap + at the top of the screen.
-
In Automations, tap Make.
You can also type
Makein the search field. -
If WalletFeed shows the WalletFeed Pro screen, get WalletFeed Pro on that screen. WalletFeed then opens the Make screen.
-
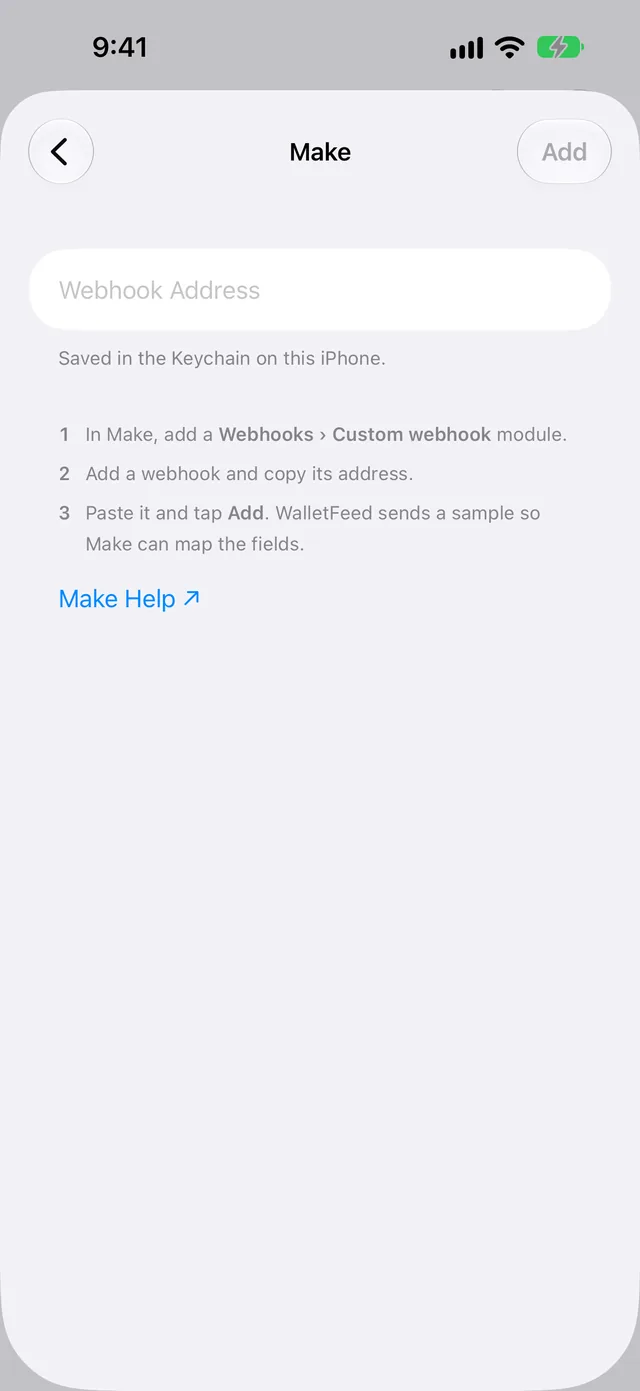
Paste the URL in the Webhook Address field.
The URL stays in the Keychain on your iPhone.
-
Tap Add. WalletFeed sends a sample to Make.
The sample is one transaction, with
merchantWalletFeed andamount-4.2. -
Read the message Send Transactions to Make?
The message tells you the data that Make receives, the Wallet accounts of the transactions and the start date.
-
Tap Send. If you tap Cancel, WalletFeed does not add the destination.
Destinations then shows the new destination with the name Make. WalletFeed sends the transactions from the start date to Make. Until the scenario is active, Make keeps these transactions in the queue of the webhook.
Step 3: Save the scenario in Make
-
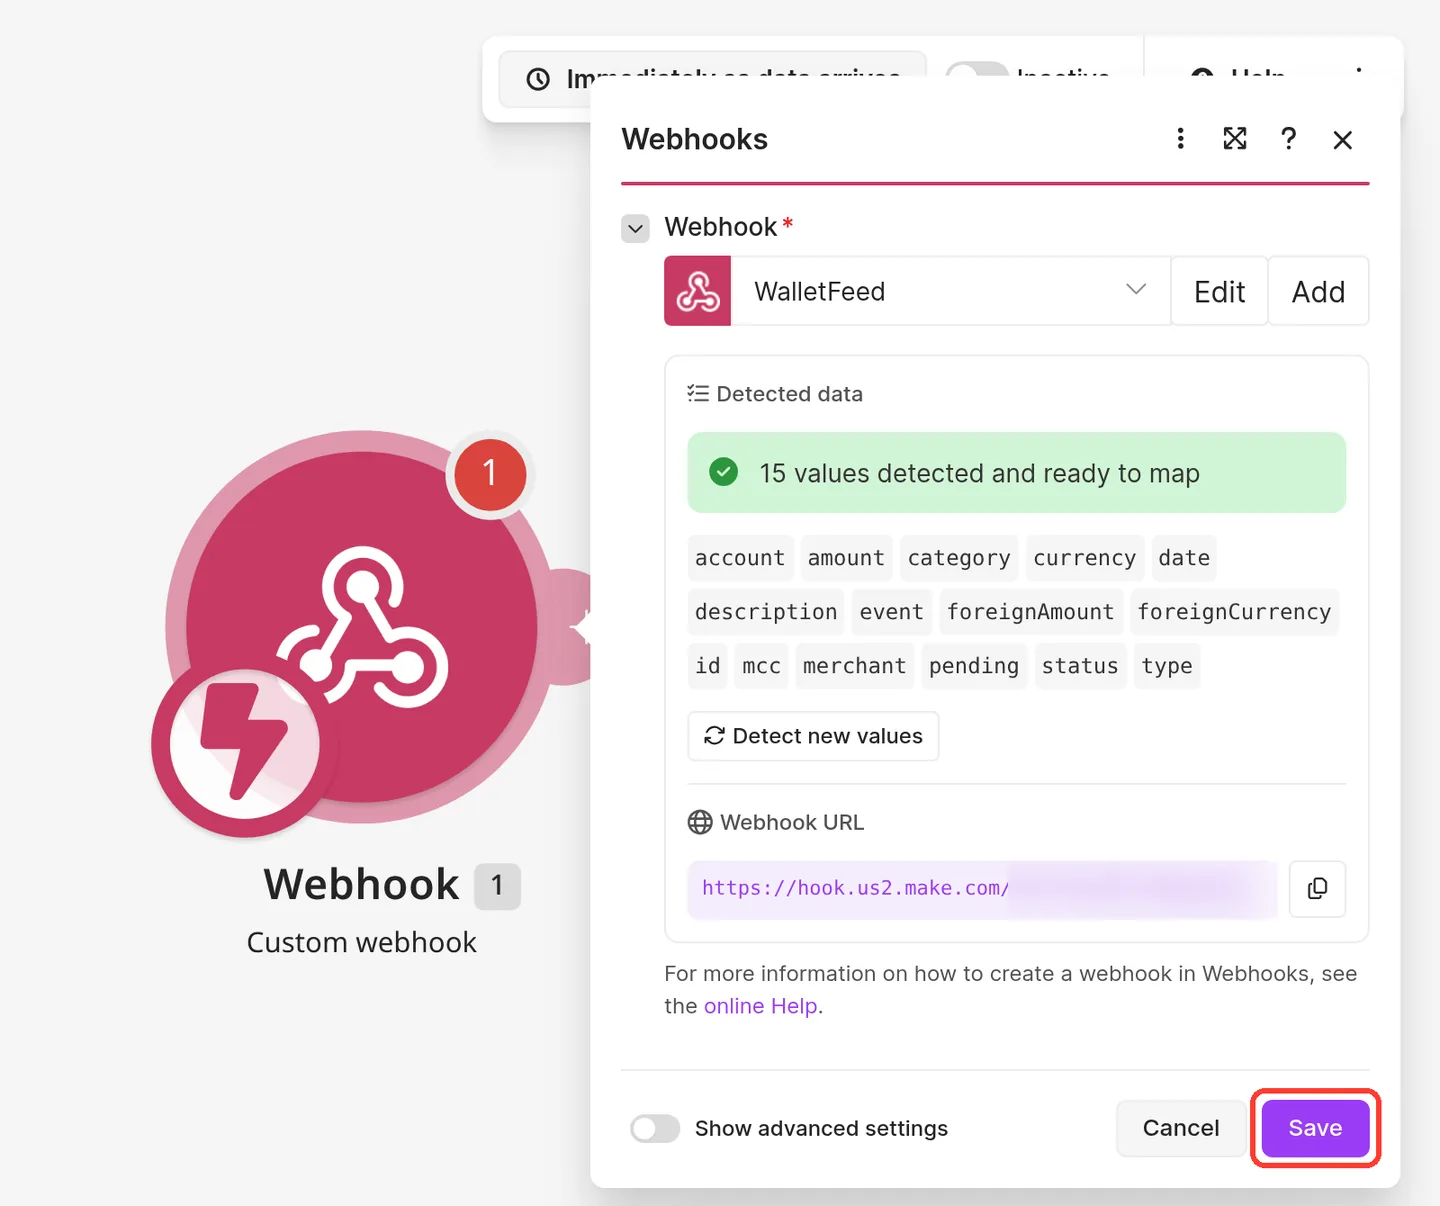
On your computer, make sure that Make shows Detected data with the fields of the sample.
Make shows “15 values detected and ready to map”.
-
Click Save in the webhook panel.
-
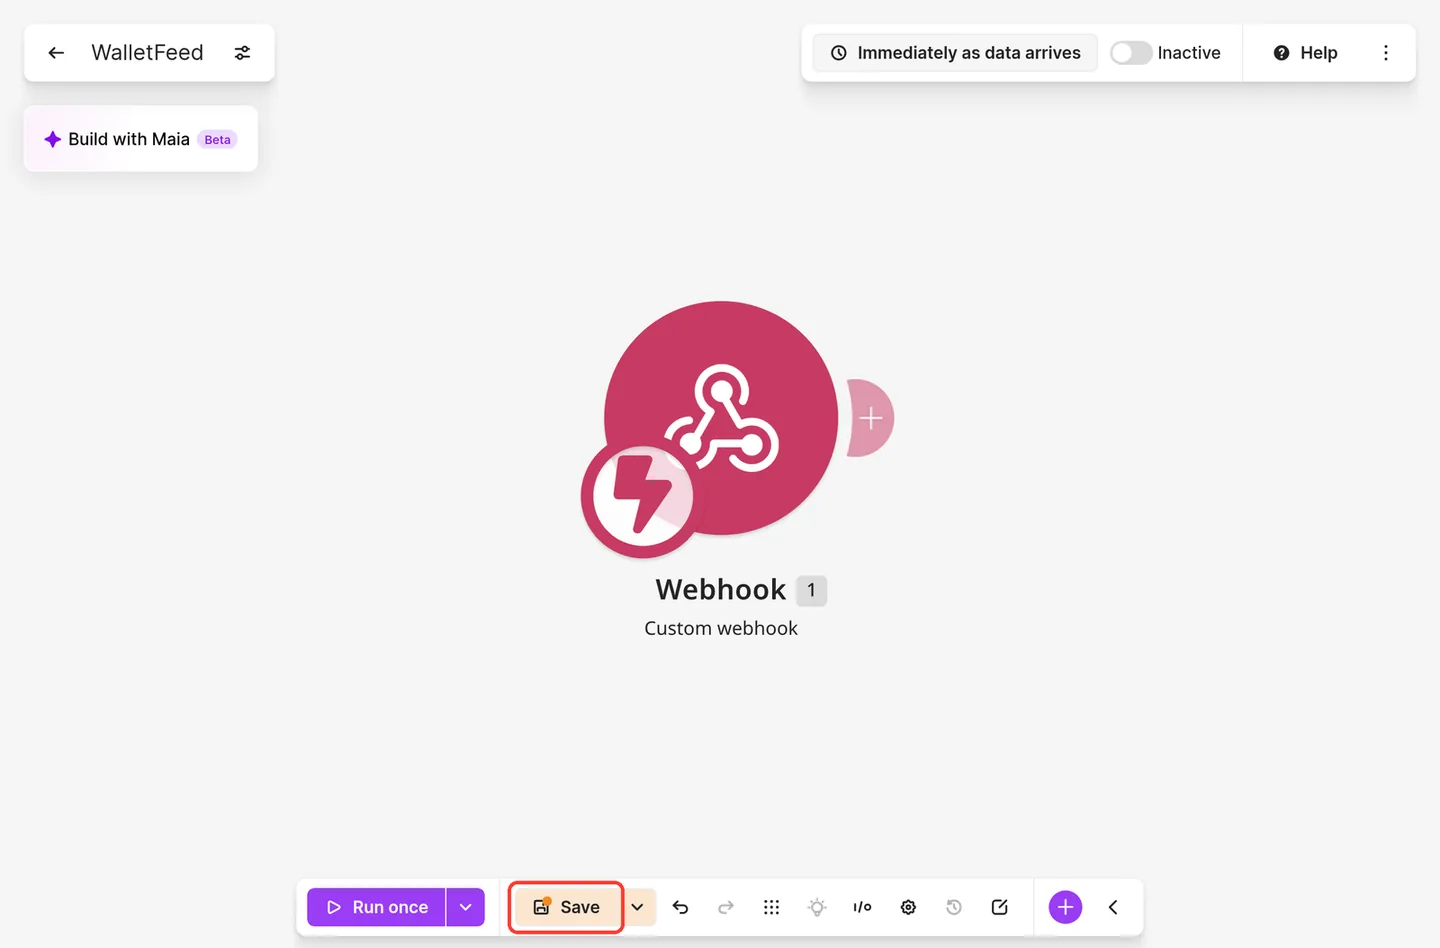
To change the scenario name, replace the name with
WalletFeedat the top of the editor. -
Click Save in the toolbar at the bottom of the editor.
If a webhook is not in a scenario for more than 5 days, Make deactivates the webhook. Then WalletFeed cannot send transactions to it.
Step 4: Add modules and activate the scenario
-
In the scenario, add more modules after the webhook.
These modules can use each field of a transaction, for example
amountormerchant. -
Click Save in the toolbar at the bottom of the editor.
-
To start the scenario one time, click Run once.
If the queue of the webhook is empty, Make shows Waiting for data... until Make receives a request.
-
If Make shows Use existing data, click Use existing data.
Make starts the scenario one time with data from the queue.
-
After the scenario starts, look at the fields in Output.
-
To activate the scenario, click the Inactive switch at the top of the editor.
With Immediately as data arrives, the scenario starts each time that Make receives a request.
-
If Make shows a message about the data in the queue, click the button that processes the data.
Then the scenario gets the transactions in the queue. If you delete the data, the scenario does not get these transactions.
Data that Make receives
Your transactions go from your iPhone directly to Make. WalletFeed has no account and no WalletFeed servers. After Make receives your transactions, the terms of Make are applicable to them.
WalletFeed sends one HTTP request for each new or changed transaction. If a field has no value, Make shows the field as empty. The request has these 15 fields:
| Field in Make | Value from Wallet |
|---|---|
event |
created the first time that WalletFeed finds the transaction in Wallet, and updated after a change |
id |
The transaction ID from Wallet. The ID stays the same when the transaction changes. |
date |
The day of the purchase in your time zone, for example 2026-10-30 |
merchant |
The merchant name, or the description if Wallet has no merchant name |
amount |
A negative number for a purchase, for example -6.75, and a positive number for a refund or a payment |
currency |
The currency code, for example USD |
category |
The WalletFeed category, for example Dining |
status |
The Wallet status, for example pending, or booked after the charge posts |
pending |
true when status is pending or authorized, and false after the charge posts |
account |
The Wallet account, for example Apple Card |
description |
The description from Wallet |
type |
The type of transaction, for example pointOfSale or refund |
mcc |
The merchant category code, for example 5814 |
foreignAmount |
For a purchase in a different currency, the value in the currency of the merchant |
foreignCurrency |
The currency code of foreignAmount |
foreignAmount is also a negative number for a purchase and a positive number for a refund. If the bank does not accept a pending charge or Wallet removes a transaction, Make receives a request with only two fields. These fields are id, and event with the value deleted.
New and changed transactions
While WalletFeed is open, Make receives changes in seconds. When WalletFeed is not open, iOS starts WalletFeed approximately 1 hour or less after a change in Wallet. If Background Sync is on in Settings › Sync, WalletFeed then sends the change. Background Sync is on until you set it to off. After your iPhone starts again, WalletFeed does not send transactions until you type your iPhone passcode one time.
Make receives a pending charge again when the charge posts. Then event is updated and status is booked, with the same id. For a refund, amount is a positive number and type is refund.
Each request starts the scenario one time. Thus, an update also uses credits.
If WalletFeed stops while it sends changes, WalletFeed can send the same changes again. A scenario that adds rows must first try to find a row with the same id. If the scenario finds that row, it must change the row.
Send previous transactions
A new Make destination also receives previous transactions from the start date in Settings › Sync › Initial History. Initial History is All until you change it. But Make receives a maximum of 30 days of previous transactions.
To send more transactions, use Send History:
-
On your computer, make sure that the scenario is active in Make.
-
On your iPhone, open WalletFeed.
-
In Destinations, tap the Make destination.
-
Tap Send History.
-
Tap a period: 30 Days, 90 Days, 1 Year or All.
-
In the message Send History to Make?, tap Send.
The message shows “Each transaction runs your scenario.”
WalletFeed sends the newest transactions first. While WalletFeed sends the transactions, the destination screen shows Sending History and a count, for example 20 of 50.
Send History uses the filter of the Make destination. Each transaction uses credits in Make. The Free plan has 1,000 credits each month.
To stop Send History, do these steps:
- Tap Send History.
- Tap Stop Sending.
The transactions that Make received stay in Make.
Change or remove the destination
To change the transactions that go to Make, change the filter of the Make destination. To stop the destination for a period, set the Enabled switch to off.
In Webhook, the destination screen shows only the first part of the URL, for example hook.us2.make.com.
To find the URL of the webhook again, do these steps:
-
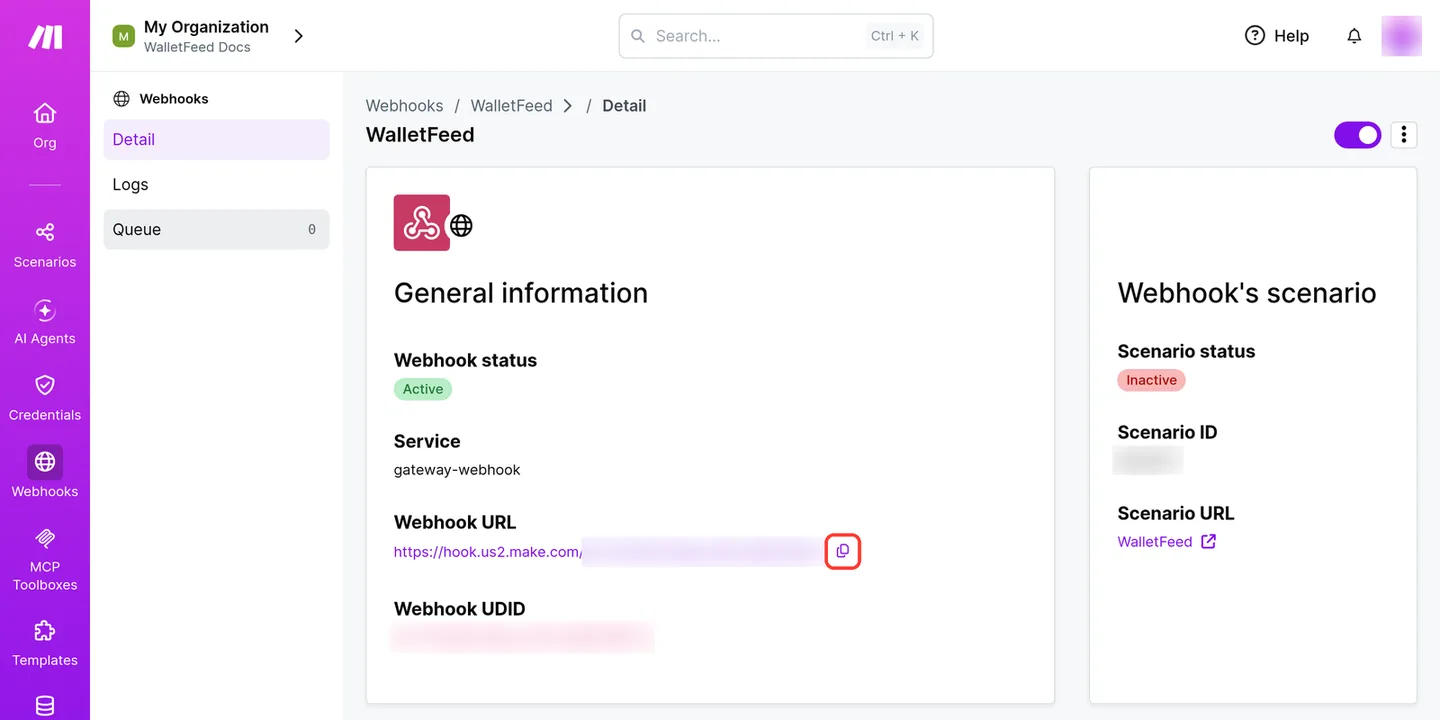
On your computer, in the Make sidebar, click Webhooks.
-
Click WalletFeed.
-
Below Webhook URL, click the copy button.
To replace the URL, for example after you add a new webhook, do these steps:
-
On your iPhone, open WalletFeed.
-
In Destinations, tap the Make destination.
-
Tap Replace URL.
-
Paste the URL in the Webhook Address field.
-
Tap Replace.
Before WalletFeed keeps the new URL, it sends a sample. If Make does not accept the sample, WalletFeed does not replace the URL.
To remove the destination, do these steps:
- In Destinations, tap the Make destination.
- Tap Delete.
- In the message Delete Make?, tap Delete.
The transactions that WalletFeed sent stay in Make.
To also remove the webhook, do these steps on your computer:
- In the Make sidebar, click Webhooks.
- Click ⋮ for the WalletFeed webhook.
- Click Delete.
- In Please confirm, click Delete.
- In Confirmation required, click OK.
Make also removes the transactions in the queue of the webhook. The scenario stops.
If there is a problem
If you cannot tap Add
The text in the Webhook Address field is not a Make webhook URL. A Make webhook URL starts with https://hook., for example https://hook.us2.make.com/.
- On your computer, copy the URL again with the copy button in Make.
- On your iPhone, paste the full URL in the Webhook Address field.
If WalletFeed shows “The webhook refused the test (HTTP …)”
Make did not accept the sample, for example because the webhook has an API key, or because Make removed or deactivated the webhook.
- In Make, add a new Custom webhook without an API key (refer to Step 1).
- Copy the URL of the new webhook with the copy button.
- In WalletFeed, paste the URL in the Webhook Address field.
- Tap Add.
If WalletFeed shows “Too many requests. Try again in a few minutes.”
Make accepts a maximum of 300 requests in 10 seconds.
- After some minutes, tap Add again.
If Make does not show the fields
Make did not show Listening for data when WalletFeed sent the sample.
- On your computer, in the webhook panel, click Detect new values.
- On your iPhone, open WalletFeed.
- In Destinations, tap the Make destination.
- Tap Send Test.
- On your computer, make sure that Make shows the fields of the sample.
- Click Save in the webhook panel.
If WalletFeed shows “Rejected (HTTP 400)”
The queue of the webhook is full, and Make does not accept more requests. While the scenario is not active, Make keeps the requests in the queue. On the Free plan, the queue can contain a maximum of 50 requests. The Webhooks page in Make shows the number of requests in the queue, for example 50/50.
- On your computer, open the scenario in Make.
- To activate the scenario, click the Inactive switch.
- If Make shows a message about the data in the queue, click the button that processes the data.
- On your iPhone, open Settings › Sync in WalletFeed.
- Tap Sync Now.
- Tap Done.
- In Destinations, tap the Make destination.
- If the destination screen shows Try Again below Sending History, tap Try Again.
If WalletFeed shows “Rejected (HTTP 410)”
Make removed or deactivated the webhook. If a webhook is not in a scenario for more than 5 days, Make deactivates it.
- On your computer, add a new Custom webhook in Make (refer to Step 1).
- Save the scenario (refer to Step 3).
- On your iPhone, open WalletFeed.
- In Destinations, tap the Make destination.
- Tap Replace URL.
- Paste the new URL in the Webhook Address field.
- Tap Replace.
If the scenario does not start for new transactions
The scenario is not active. Make keeps the transactions in the queue of the webhook.
- On your computer, open the scenario in Make.
- To activate the scenario, click the Inactive switch.
- If Make shows a message about the data in the queue, click the button that processes the data.
If Make receives transactions only while WalletFeed is open
Background Sync is off, or your iPhone started again and you did not type its passcode.
- In WalletFeed, open Settings › Sync.
- Set Background Sync to on.
- After your iPhone starts again, type its passcode one time.
Related
Updated October 30, 2026